
Table of Contents:
A. Zillow Reviews
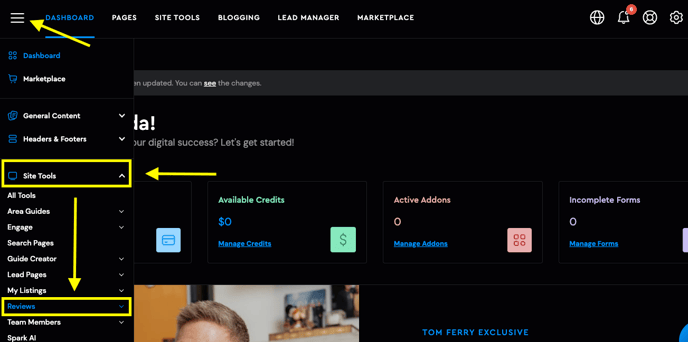
You can also access the settings if you go to Site Tools and the Reviews section.

Over here, head over to the review settings:
Over here, head over to the Zillow tab:
Adding Agent Information: Scroll down to find the empty fields for "Agent Name" and "Email." Click the "Add New" button to generate a new row where you can input the agent's name and email. You can add multiple agents if you wish to showcase their Zillow reviews.
Once you've entered all the necessary information, click the "Update" button as shown above.
Reminder: Ensure that the email used is the one linked to Zillow, and that you or your agents have at least one review on this platform.
Bridge Interactive: The "Bridge Interactive" option is already configured with an Access Token. Please do not change or remove this setting. You would also want to put your Bridge Access Token if you decide to use this option.

If you are on a team and different agents have reviews on their profile you will need to add each agent to be able to display all the reviews available.
B. Google Reviews
To connect your Google reviews, ensure you have a Google Business Profile set up with at least one review. This task is best handled by your designer or support team, as it requires your Google Customer ID, which is generated by Google.
Navigate to the "Sources" tab in the Reviews Settings. Google should be listed by default. If it's not, click on "Add Source" and select Google from the list:

After selecting Google, you can name this integration on the left tab called "Label" —preferably using your name or your company’s name followed by ‘Reviews.’ On the right tab, enter the Google Customer ID, which typically begins with the code "ChIJ."

You can retrieve this ID by clicking the blue "Find the ID of a particular place" link. Be aware that if other businesses with similar names exist in the same area, such as "Jeffrey Rivers Real Estate" and "Jeffrey Rivers Attorney Office," finding your specific ID might be challenging, especially if the other business has been established longer or has more reviews.
If you're unable to find your Google Customer ID, please email support at support@agentfire.com for assistance.
Final Step: Once you've entered all the necessary details, click the "Update" button as shown above.
c. Facebook
To connect your Facebook reviews, you must have a Facebook business page and at least 1 review.
Head over to the Sources tab on the Reviews Settings, Facebook should already be here by default, if this is not the case click on Add Source and Select Facebook from the list:

On the Label tab in the left you can type in any name for instance 'Facebook' or preferably your business name. On the right tab, just copy your facebook page URL like this www.facebook.com/your-business-url.
Note: If your Facebook page is a New Experience Page, we won’t be able to fetch your reviews since reviews, in this case, are accessible only to logged-in users. You can make your reviews fully public by switching back to Classic Page. However, if you switch to Classic Page, the new features of the New Experience Page may get lost, including Insights, Ads and Content (such as posts, photos, videos and stories).
Once you're finished click on the update button.
d. Custom
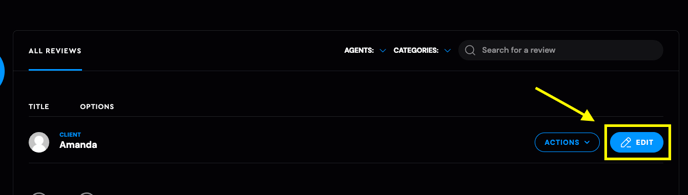
Custom source means reviews that you manually add in through your Site Tools - Reviews tool:
Over here you can manually type in reviews from clients from any source (Google, Facebook, Yelp, old website, etc...) that you wish to have reflected on your site. Click on the blue Add Review button:
Then you'll be prompted to enter the name of the client, once finished click on the Add Review button at the bottom:

Next, a window will pop up on the right:
Here's a breakdown on this:
a. You can choose a status (Published, draft, pending), to have it reflected on the site make sure it's set to Published. If you want to hide but not delete a published review, you can set it as Draft. Reviews that came to the site through our template will be set to Pending, if you approve them and want them to be shown on the site please update the status to Published: 
b. You can set Categories in case you wish to have different reviews be reflected on different pages or sections in your site. By default, you'll see "ALL" category being applied, but you can create new categories by clicking on the Add New Category button: 
This window will pop up, simply input the name of the category and click on the green Add button:
c. Client name - by default this tab will have the same name as the inputted name, you can update the name over here in case of a typo or misspelling.
d. Rating - You can customize the ratings by selecting the desired star level. If you want to exclude certain ratings, simply skip clicking on that star level. 
e. In the Title section, you can input the same review title from the source, a subtitle (if applies) in the Subtitle field and the contents of the review in the Review field: 
f. If you have the image of the client you can upload it on the Browse/Upload Image link and lastly if this is a review link, copy and paste the URL from the source in the Video URL field.
Changes will be saved automatically, in case you don't see a green 'saved' confirmation message at the bottom, you can click on the green Save button at the end:

e. Yelp
To connect your Yelp reviews, you must have a yelp account and at least 1 review.
Head over to the Sources tab on the Reviews Settings, Click on Add Source and Select Yelp from the list:

On the Label tab in the left you can type in any name for instance 'Yelp' or preferably your business name. On the right tab, just copy your Yelp business URL like this www.yelp.com/your-business-page-url .
Once you're finished click on the update button.
Spark Editor: Blocks - Reviews
Display Testimonials quickly and easily.
Showcase what your past clients say about you with the Reviews block quickly and easily.
The Review Block can be added by clicking 'Add A New Block', expanding the categories and selecting Reviews.

There are two customizable tabs within Reviews. Content and the Reviews themselves.
Content
-
Background Color
-
Title
-
Title Look Like (h1, h2, h3, etc.)
-
Button Label
-
Button Link

If you click on the Design Tab you can adjust the Background Color and Title Color.

Some further options like:
-
Layout
-
Displaying the Submit Review Button
-
Categories (These can be adjusted inside the plugin)
-
Items Limit ( How much Reviews to display)
-
Show/Hide Star Rating
-
Content Alignment (Auto, Left, Right, Center, Justify)
-
Primary/Secondary Color
-
Button Label (Button Text) / Button Link
 The Submit Button and Ratings section:

Activating the Show Submit Button will expand further options for it, where you can adjust the button's text, class, and color.
Note: You can leave the class option empty, this is strictly a field for designers.

Activating the Show Star Rating Button will also expand further customization options for you to setup.

Now let's jump into the most important visual aspect- The Layout.
Layout Options
![]()
There are a few layout you can choose from - Let's dive deeper, and give you some examples.

Aggregate Rating
This layout will display an aggregate rating. (an average from all the reviews)

Default Layout
The Default layout displays a Reviews in a column (on top of each other)

Grid Layout
This layout will display Reviews in a grid view.

Additionally, you can control how many reviews will be shown per row.
Example: If I set the Grid item limit to 2, it will only show 2 Reviews per row.
Left/Right Layout
This layout will display the Reviews in a zig-zag form.

Slider Layout
This layout will display the Reviews within a slider with navigational arrows, which slowly slides through reviews.

Video Layout
If you have a video submitted with your Review, you can display it with this layout.

Zillow
This will display imported reviews from Zillow.

Additional notes:
1. Please note that negative reviews from Zillow can't be hidden.
2. In accordance to Zillow regulations, we cannot combine Zillow reviews with other sources (Google, Facebook, Custom or Yelp) in the same section or slider.
3. If you have any further questions on this topic or ran into any issues, you're welcome to contact support at support@agentfire.com .