
In order to achieve this, you will need to do the following steps:
-
Purchase a new domain.
-
Create a free account with Cloudflare
-
Redirect the site URL to that domain
1. Purchasing the domain

To have a standalone domain with an SEO mask, you'll need a registrar where you can update your DNS zone files & domain purchase agreements.
We recommend Godaddy.com.
2. Creating a free Cloudflare account

Cloudflare account sign-up takes less than 5 minutes.
-
Enter your Email address and Password.
-
Click Create Account.

The Cloudflare UI will ask you to add a site to Cloudflare.
Adding a domain to Cloudflare
-
Log in to your Cloudflare account.
-
Click on Add site from the top navigation bar.
-
Enter your website’s root domain and then click Add Site. For example, if your website is www.example.com, type example.com.
-
Cloudflare attempts to automatically identify your DNS records. This process takes approximately 60 seconds to complete.
-
Click Next.
-
Select a plan level - Select the Free Plan
-
Click Confirm in the Confirm Plan window that appears.
-
Review whether all DNS records were identified in the DNS query results window.
-
Click Continue.
-
Copy the 2 Cloudflare nameservers displayed and click Continue.
-
To finish domain setup and activate your domain on Cloudflare, change your domain nameservers to Cloudflare.
Pointing your domain to the AgentFire network
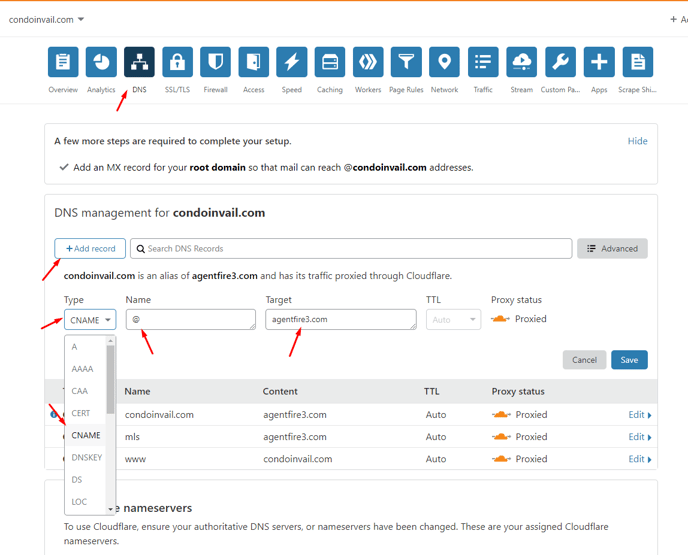
When you first add a domain to Cloudflare, a scan of common DNS records is performed in an attempt to automatically add all of the domain's DNS records to the Cloudflare DNS app. In order to point your domain to the AgentFire network, you need to add a CNAME record.
-
Log in to the Cloudflare dashboard.
-
Click the appropriate Cloudflare account for the domain where you will add records.
-
Ensure the proper domain is selected.
-
Click the DNS app.
-
The UI interface for adding DNS records appears under DNS Records:
-
The Type selection defaults to A records. Change that to CNAME
-
Replace Name with a subdomain or the root domain (@).
-
For the target set agentfire3.com
Keep in mind that your site might not be a part of the Agentfire3 network. In order to find out which network your site is located, please reach out to our support support@agentfire.com

Now that the purchased domain is pointing to AgentFire services, and the page URL has been confirmed, it's time to add an SEO mask in the redirect manager in order to complete the setup.
Navigate to:
Settings > AgentFire Settings > Redirect Manager
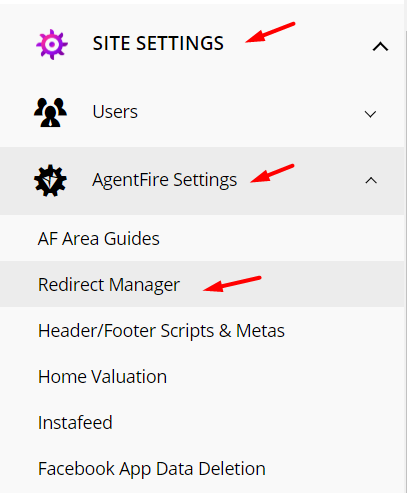
If this is your first visit to the redirect manager, you will likely not have any other redirects in this location.
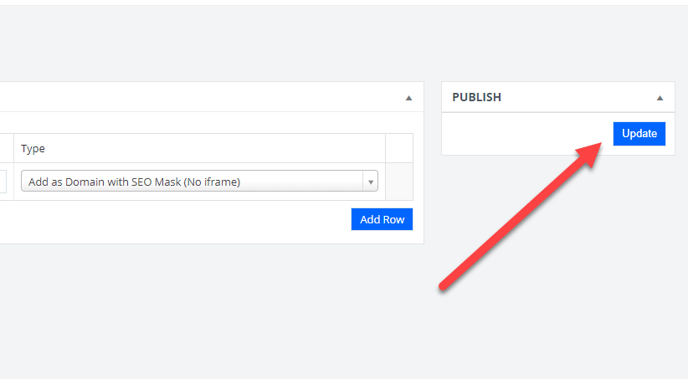
Select Add Row to enter your first redirect.

Select from the dropdown list of options
Add as Domain with SEO Mask (proxy, no iframe)
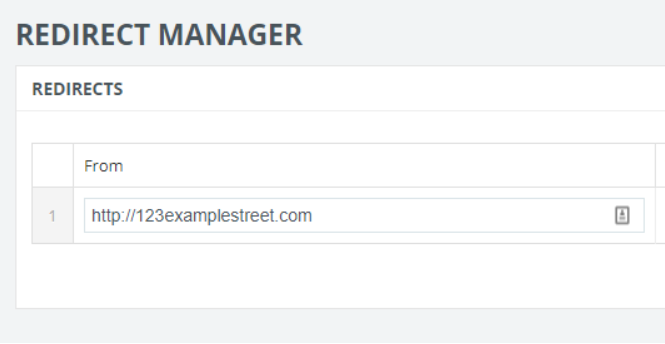
In the From Field:
Your originating domain will need to be entered. It should be an HTTPS domain. Be sure there isn't a backslash at the end of the domain name. Lowercase letters only!
For clarity:
-
HTTPS only
-
do not use canonical url with a / at the end
-
lowercase letters only
Example: https://123examplestreet.com
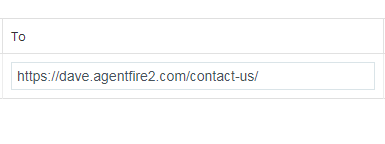
In the To Field:
Paste your page URL directly from the tab you copied from. This will be an HTTPS URL, and it will be canonical, so it will display a / at the end.
Example: https://dave.agentfire2.com/contact-us/

With your From and To fields verified and correct, click the publish/update button to save your changes.
That's it! View your page on its new domain name!