Use the design tab to quickly breeze through each available setting and decide what information and features you want to offer.
Once you have reviewed how to navigate your AF Editor, you're ready to start building a listing entry. Starting with the Design tab, we'll walk through all of the dropdown categories and provide information on what each category focus is, as well as what features to consider enabling.
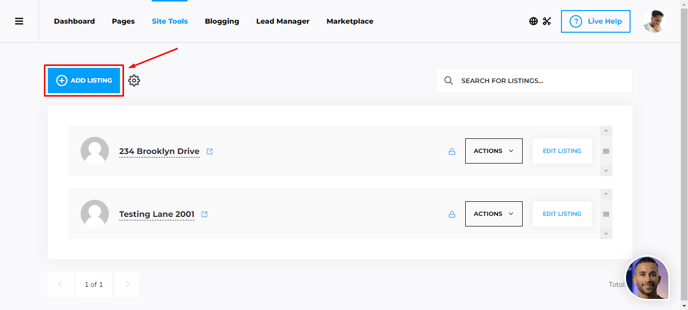
First we need to navigate to Site Tools > My Listings, then select the Add Listing button.
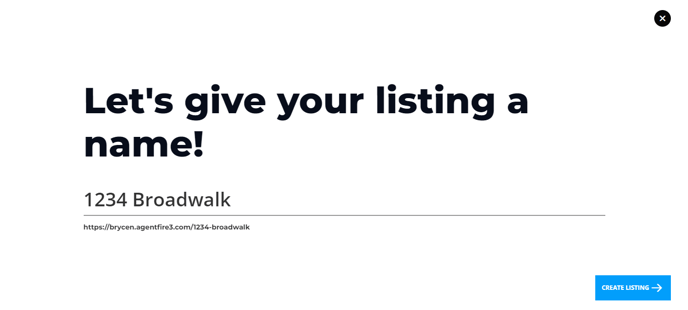
Then we need to give our listing a name.
After we created our new empty listing we need to start editing it.
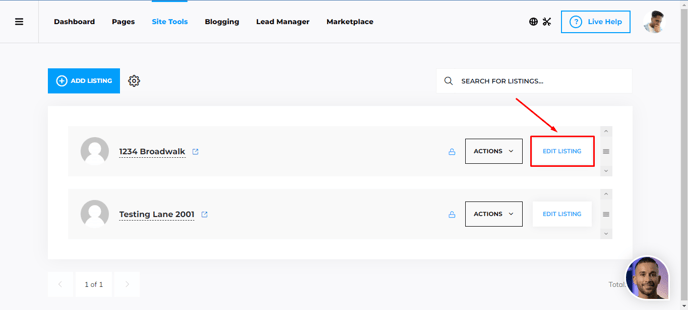
Start by clicking on the Listing Details tab of your AF Editor.
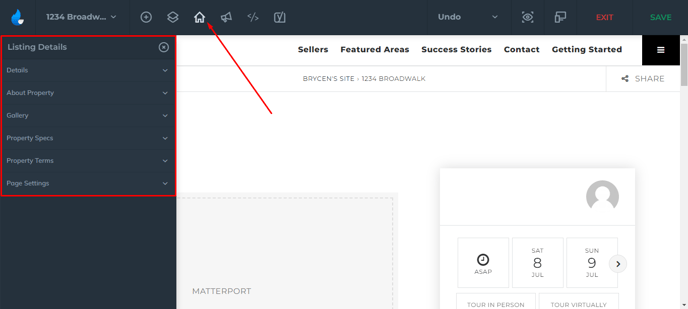
Inside, you'll see a number of subcategories shown in an accordion format. First lets take a look at the Details category, which includes basic address based information of the listing, as well as pricing and 3D tour options.
Click the Details category to open it's available data entry options.
The Details Category:

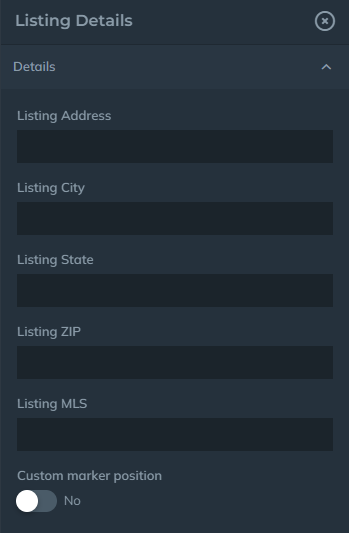
Enter your listing address data along with optionally the listing MLS #.
At this point you will also be given the option to allow visitors to request a showing of the property directly on the page. A form modal is available to click which end users can use to indicate their own availability to you.
Click to turn on Schedule a Showing Button
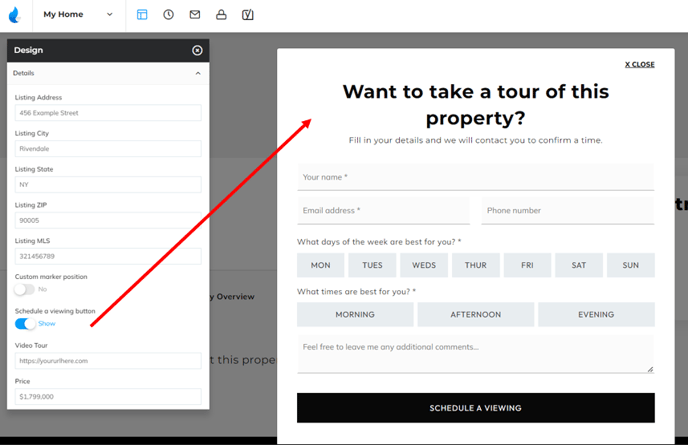
You may also have a 3D tour you may want to make available to end users. Use this link if your resource is not a matter port video. This link is intended for use with embedded video players like YouTube, Vimeo, and other video based 3D tour players.
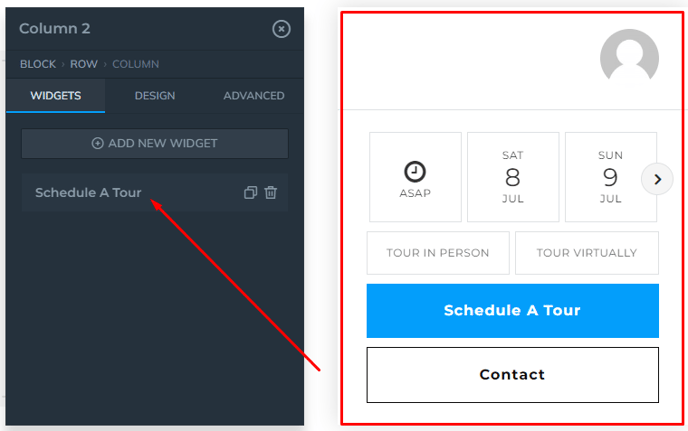
(NOTE: If you're using our updated listing template, then you can access this section from the Schedule A Tour widget on the page.)
Add your video URL to the 3D tour entry box.
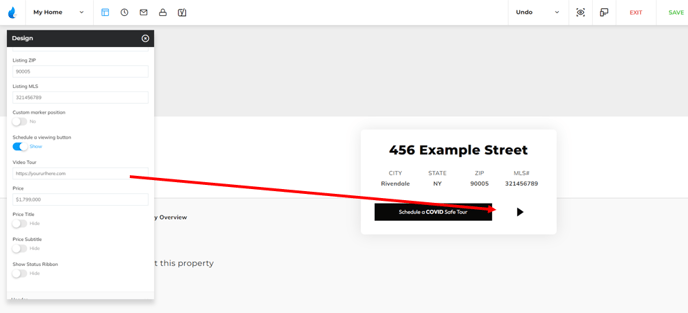
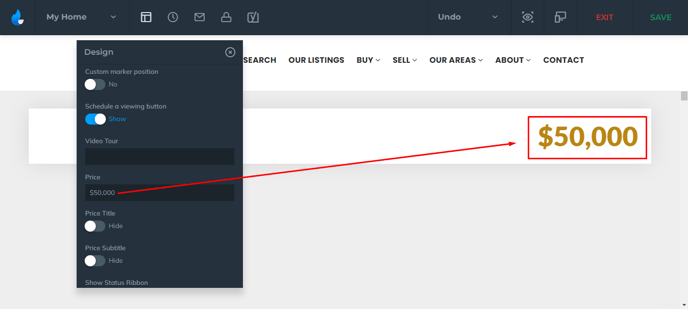
The pricing field is completely editable, so you may use dollars or any other currency you happen to be making this property available in. You may also use this space to denote that a price is not yet available.
Add your price to the listing entry.
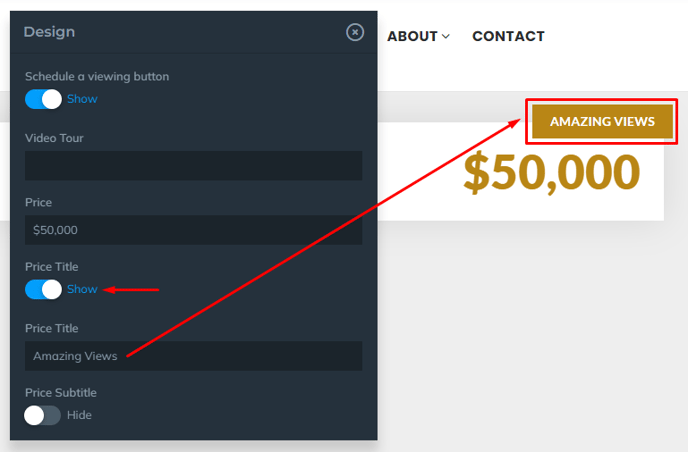
You may also optionally use a short phrase or catchy title to enhance the listing with some of it's best features. Common sayings like "Beautiful Views", or "Entertainers Kitchen", or "Pool & Spa" can help entice viewers to read more and view more of the listing data on the page.
Add your optional Price Title.
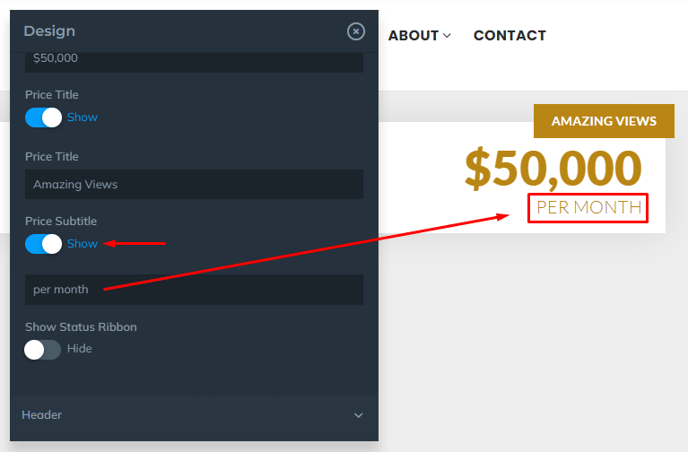
Add your optional pricing subtitle.
Displaying the Status Ribbon.

Once the Status Ribbon is enabled, it will be displayed for that listing when using Listing Page Feed block.
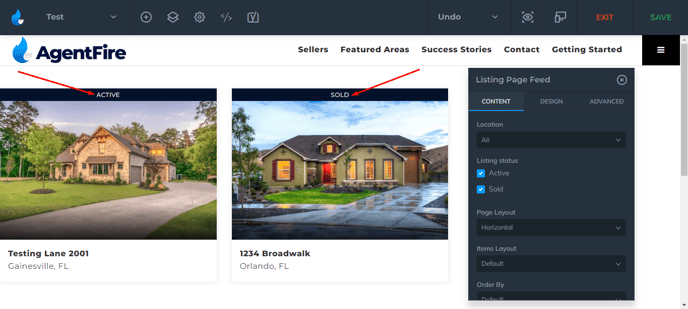
Please refer to configuring a listings feed for adding this Listing Page Feed block to a page.
Add a Custom Marker (Address)
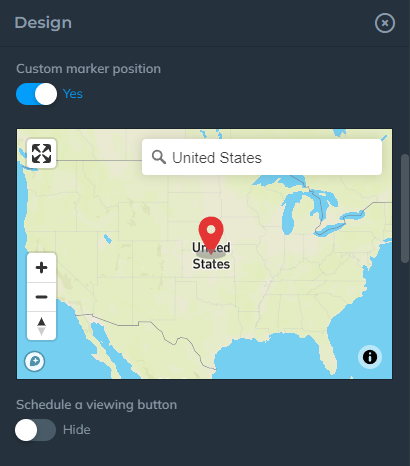
By enabling the custom marker, a small box will appear with a map where you can manually search for the address and place the marker.
You're now ready to review and add images to your listing entry. Lets move down to the Header & Gallery category.
The Header & Gallery Category:

This category is where you can show or hide the header and footer of your site in the listing data, as well as what images appear in the main slider on the page. Below we'll walk through how each works and what to consider.
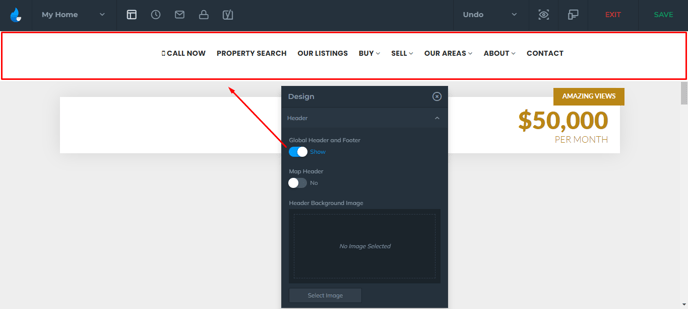
Toggling off the Header and Footer:
Do you need to market a property without showing off your own listing company data? It's easy to hide the header and footer so you can easily showcase the listing and even make use of our SEO mask options for presenting this listing entry as it's own custom domain!
Click Hide Global Header and Footer
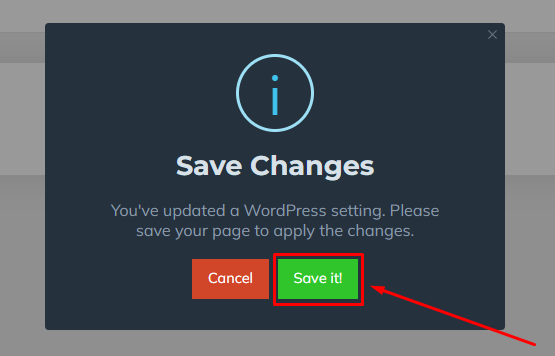
This will prompt you to save the change and reload the page.
When the page reloads, you'll see that the site header and footer are no longer shown in the layout, making the featured listing image and the team member contact and pricing bar the first items your users will see on the page.
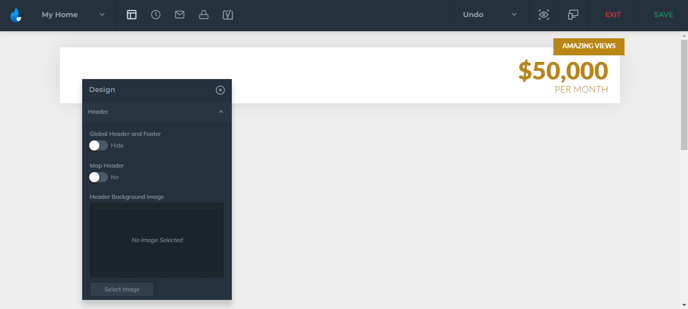
Listing Header Background Options:
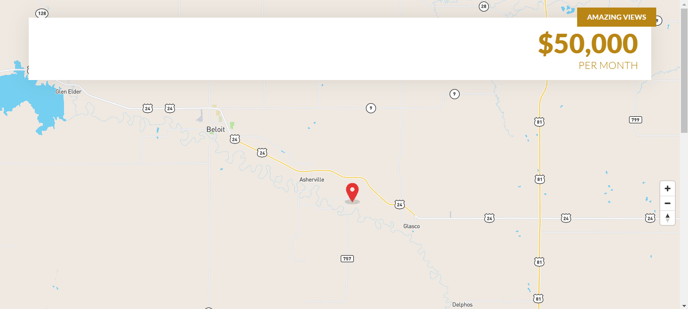
You may elect to use a large featured image, or a single color background, or even a map of the location as your primary page background. When enabling the map background, the map will only be rendered on the resulting page, not in your AF editor environment.
Toggle the map header on to set a map background.
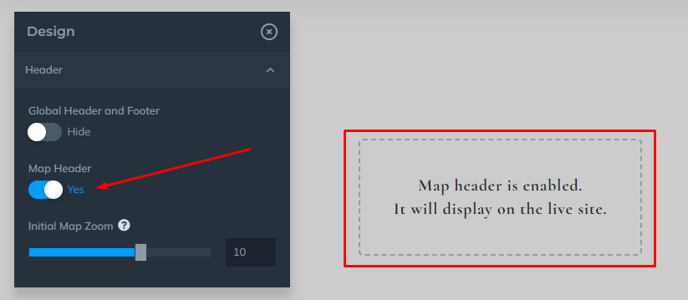
You can also control the zoom of the map, which will appear under the map header button as it gets enabled.
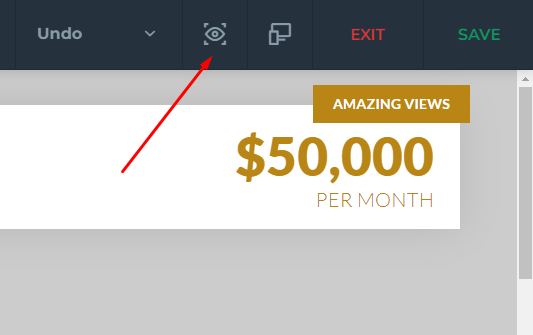
With the map enabled, you may use the "View in new tab" button to see the resulting map rendered on the listing page.
Toggle the map header off to use a featured listing instead.
With the map header off, click the button to add a new header image to the page.
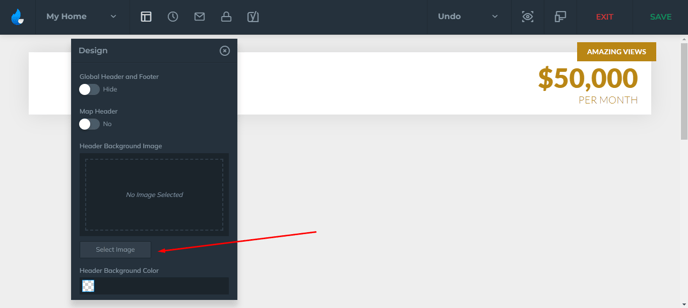
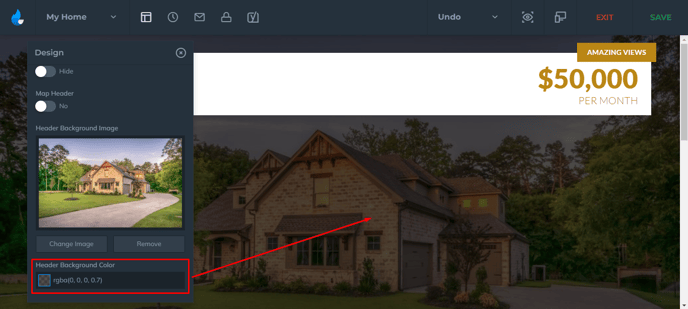
This will open your media library, where you may choose from or upload a new image for use with your listing. It is highly recommended that you review image optimization principles prior to uploading images to a listing.

Optionally, add a color filter over your featured listing to enhance the appearance
Adding Images or Videos to A Gallery on the page
It's time to add those beautiful photos you want your viewers to see in a gallery! You may add images in bulk using the Add Images button to your media gallery.
Press the Add Images button to select or add images to this listing.
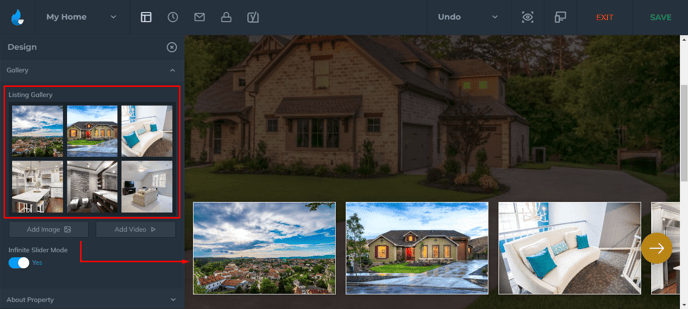
Hold Shift to select the beginning and end of an image group, or hold control when clicking images to select multiple images to include.

You may also drag & drop images that have been added to the gallery to re-arrange them on the page, as well as remove them easily from the gallery with the X button.
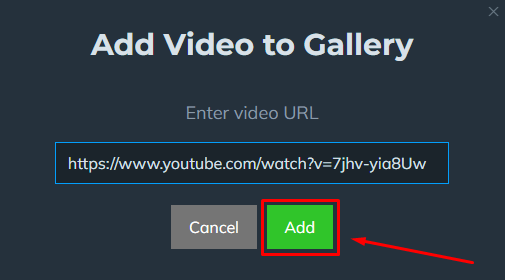
Adding Video to the Gallery
Did you have some great videos you wanted to show off as part of the listing that are not the primary tour? Easily add them with just your YouTube or Vimeo link!
Click the add video button in your gallery.
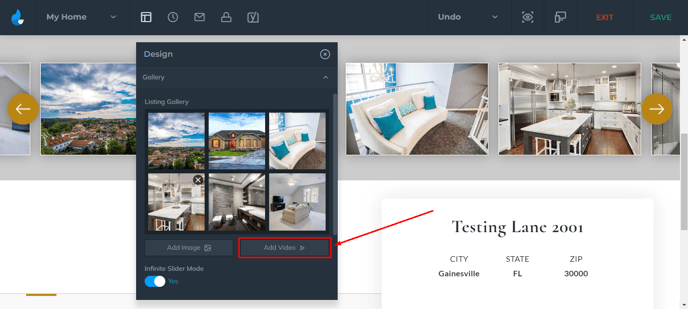
In the popup that appears, place your YouTube video link. You do not need to use any share options or fancy footwork. Simply copy the video URL that you want!
Paste your URL into the Add video modal.
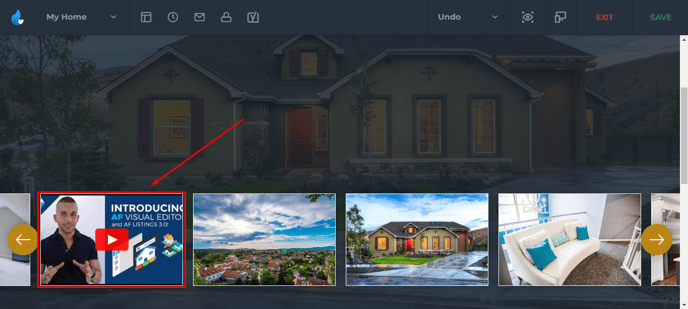
Optionally, use drag and drop to place your video in the gallery position you want.
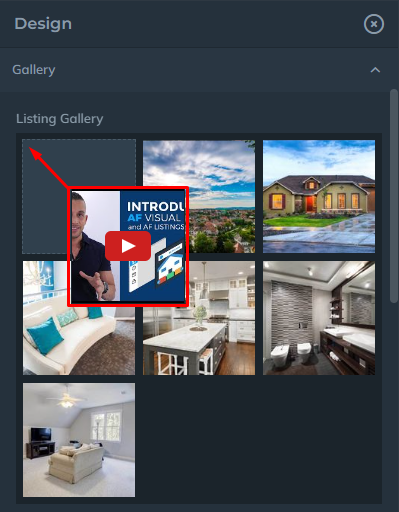
Your video will display in the gallery slider in the hero section!
Be sure to save your work! It's time to take a look at the About Property Category.
The About Property Category:

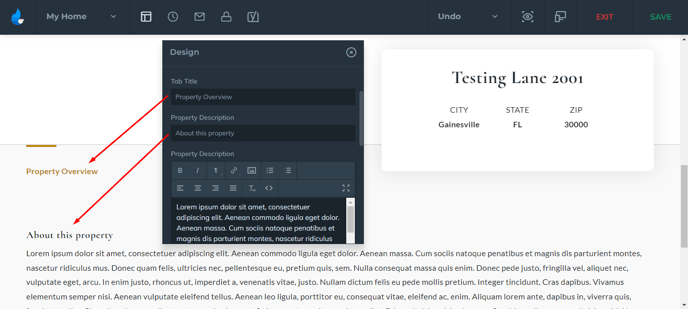
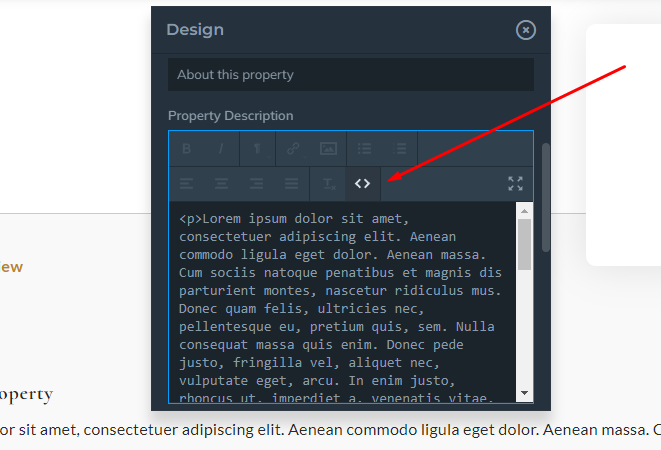
In this category, you'll have the opportunity to describe the property, and this first tab on the page will display on page load for viewers to see immediately. You may control the tab title, the property description title, and the property description.
Enter your property description and property description title.
You may also optionally enter html code to this section by using the <> symbol in your text editor.
Click the <> symbol to switch to an HTML view.
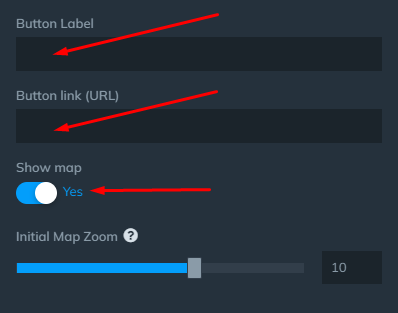
You can also add a custom button and enable an additional map
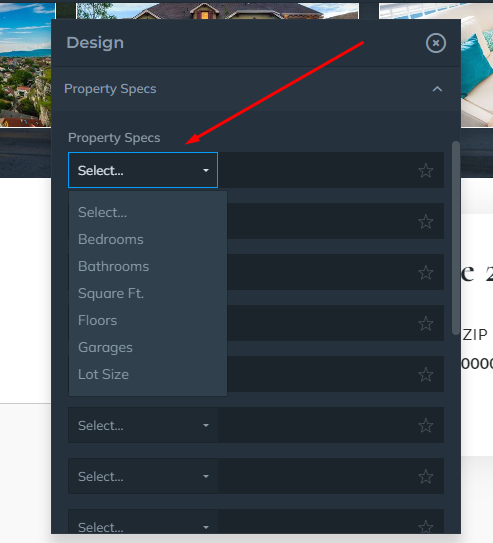
The Property Specs Category:
In this category, some primary characteristics of the property can be entered. Bedrooms, bathrooms, square footage and more can be highlighted for viewers.
Click from the dropdown to select a property characteristic:
The first three specs you enter will be shown to the left of the primary listing and schedule box directly below the listing image gallery.
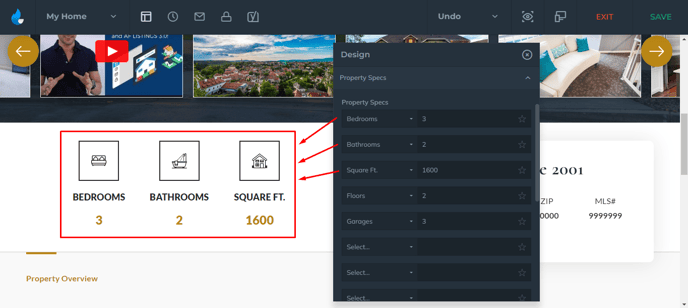
You may highlight any of the specs in any order you please, by adjusting which items are selected for in the first three defined positions.
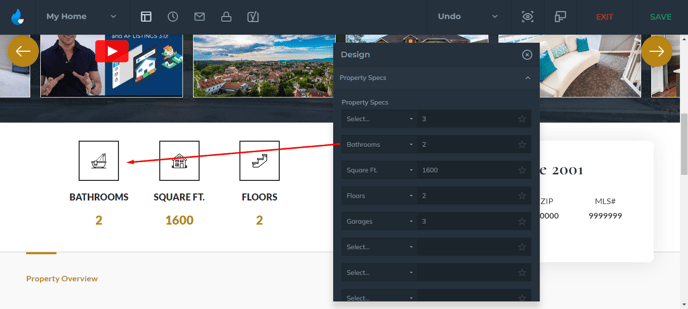
Up to four property specs can be favorited to display at a time.
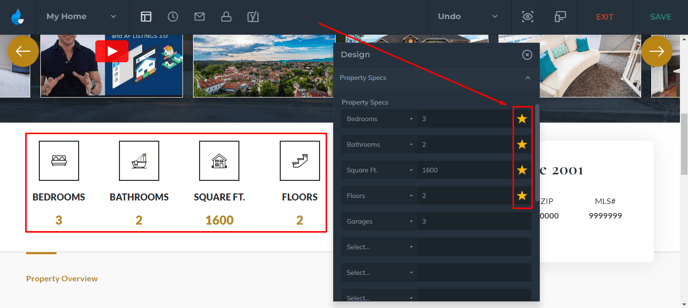
You may also adjust the icons that are used for these specifications in the Settings area for the Listings v3 plugin.
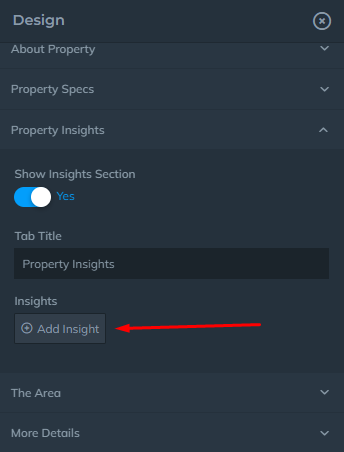
The Listing Insights Category:
In this category, you'll find a number of very useful ways to enhance your listing with additional property characteristics and additional specs not shown in the primary 3 locations on the page.
Enable the optional listing insights tab.
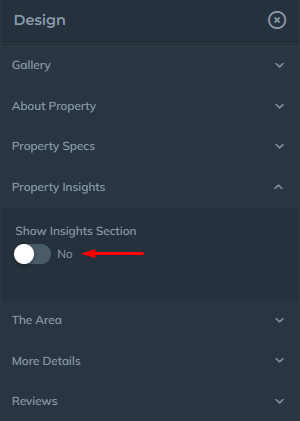
With this toggled to the On position, you'll see any other property specs you entered into the Property Specs Category shown on the page, directly above any insights you decide to create.
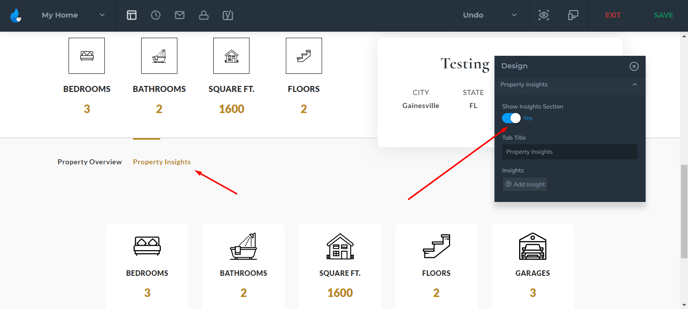
In addition to property specs, the insights tab allows you to build comprehensive accordions of useful information.
Click Add Insight to add your first entry here.
Each insight will allow you the use of a title, an expandable description area, and a useful set of comma separated bullet points.
Enter your insight title and description to the page.
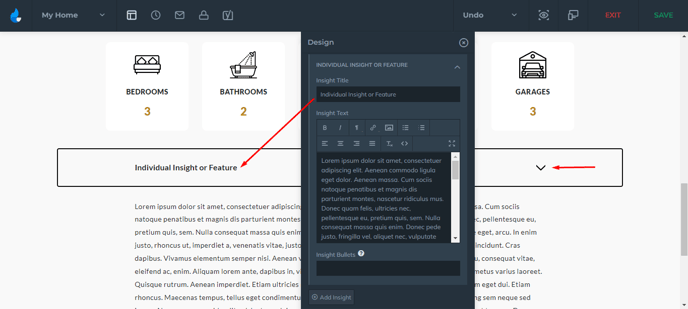
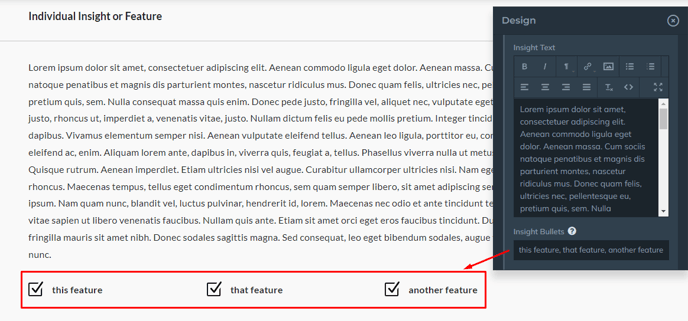
Individual insight bullets can be entered as comma separated text, and will automatically format themselves in to a grid of data points that can be used to highlight information about the property.
Try adding a few insight bullets.
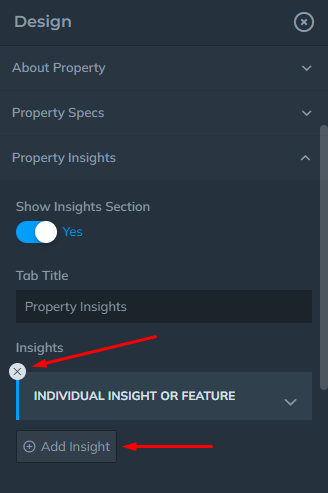
You may also add more than one insight to the page, as well as reorder or remove existing insights that are not needed.
Click to add a second insight, or delete an existing one.
Be sure to save your work! Next lets review how you can optionally link one of your AF Neighborhood Guide entries to this listing.
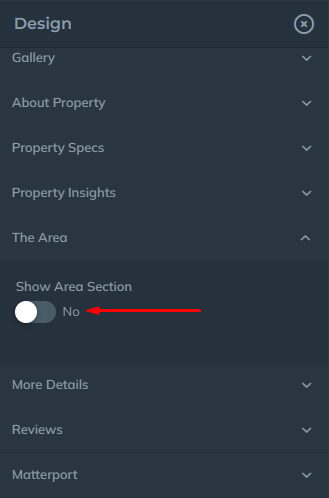
The "Area" Connection Category:

This optional category is available for use if you are currently subscribed to the AF Neighborhood Guides plugin, and have created an entry there to highlight a location that your listing entry is located in.
Click to enable the Area Category:
This adds a new content tab to your listing entry. The title is edible, and you may select from any currently published AF Neighborhood Guide to link to.
Edit your Tab Title for the area:
(Example: Learn More about Boston)
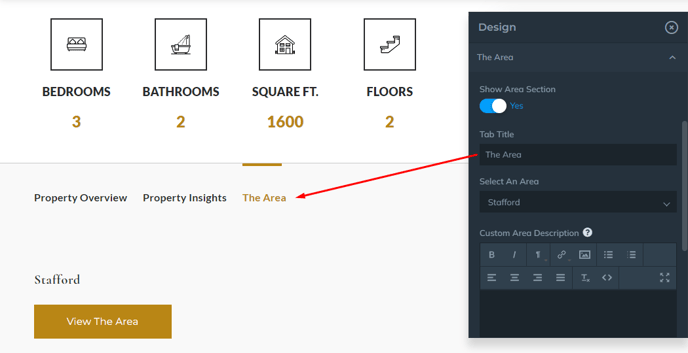
Using the dropdown selector, choose the AF Neighborhood Guide to link to the View the Area button on the page.
Choose an area from the dropdown:
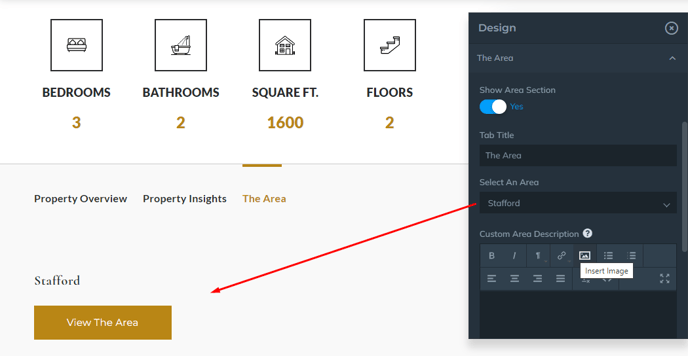
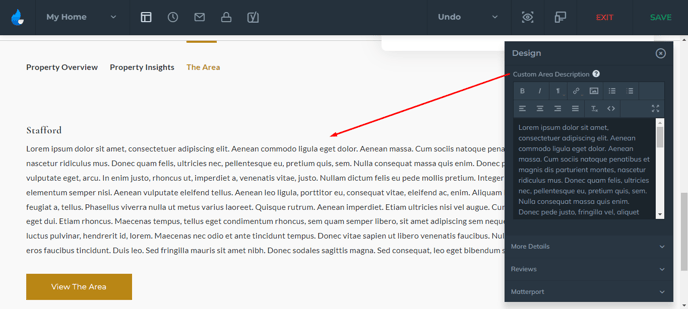
Optionally, you may add an original description to the page. We recommend not using the same text found on the neighborhood guide page, and rather make the description of the location and data relevant to the listing and it's proximity to this location.
Add your original Area Description:
Be sure to save your work! Next up we'll review a 4th and final tab option, which focuses on any extras or information that had not been covered in the insights tab.
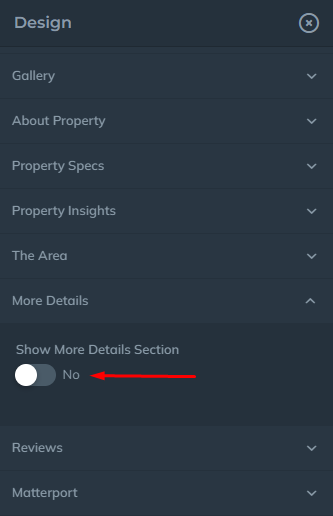
The More Details Category:
This optional category operates similarly to the insights tab, but is reserved for that bit of "extra" content that may be only loosely related to the primary listing data.
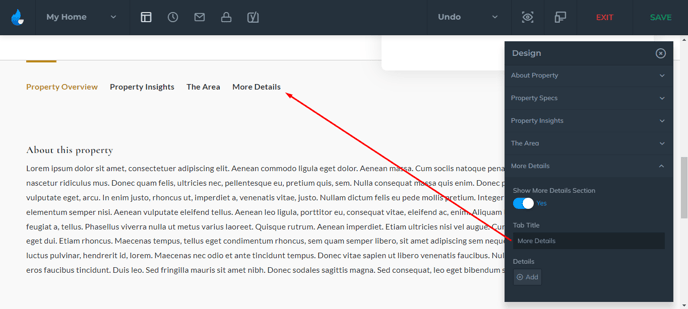
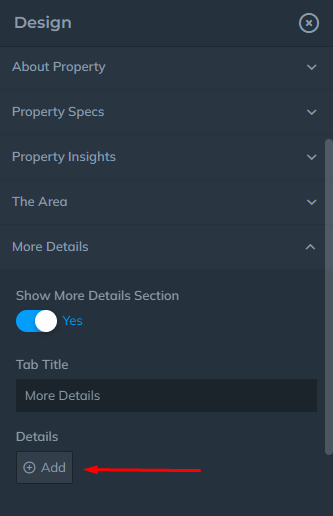
Click to enable the More Details tab:
You may control virtually every aspect of this tab, including the tab title, as well as any subtitles on the page and text areas that follow.
Edit your tab title as needed:
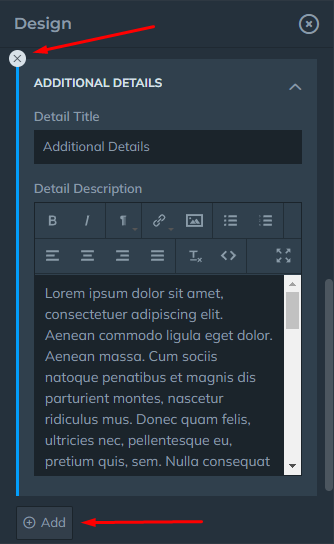
Lets add a detail, and configure an initial section on the page.
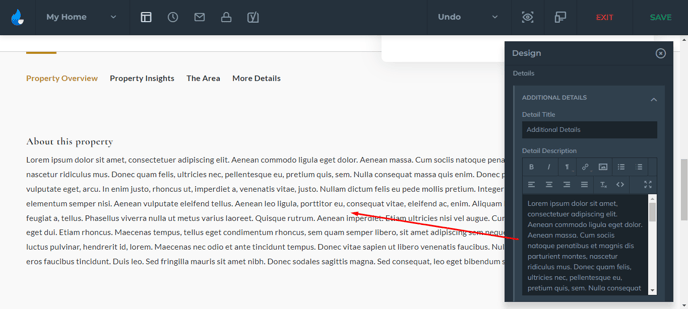
Click Add new detail:
Add your detail title:

Provide the description, text or click the <> symbol to embed objects or view html code.
Add your detail description:
Similarly to the insights tab, you may add more than one detail to the page. You may add or remove tabs as needed.
Click to add or remove additional details as needed:
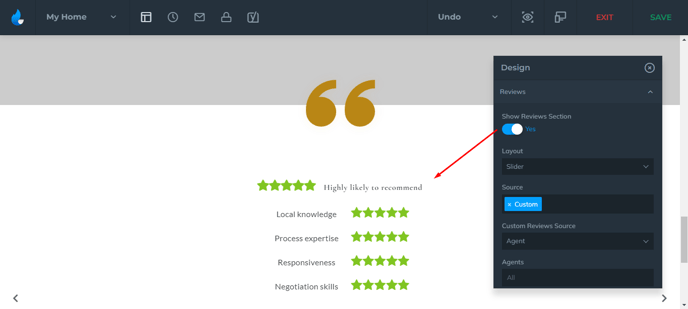
The Reviews Category:
This optional category allows for the page to display unique agent reviews or company reviews shown on within the AF Reviews plugin.
Click to enable the Reviews category:
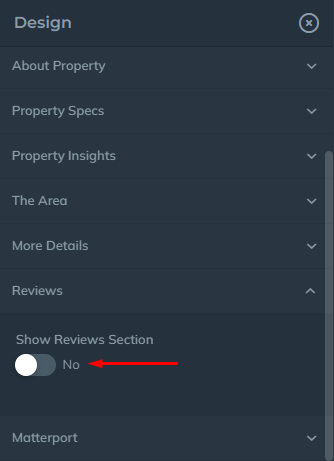
Once enabled, this category will automatically show agent specific reviews, followed by company reviews on the page.
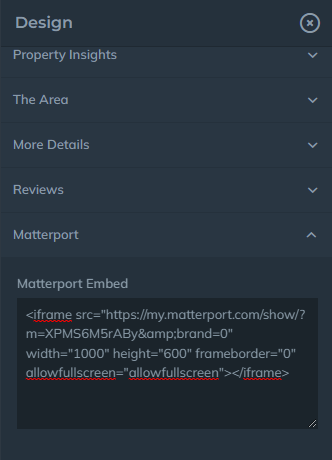
The Matterport Embed Category:
This optional category is for agents who make use of the https://matterport.com/ 3D tour system, as well as any other similar embeddable objects that are intended for immediate render and display on the page when initially loaded.
Paste your embed code into the matterport embed code box:

Continuing Education:
Learn how to navigate the AF editor, build your listing content, enable awesome features and more in our additional articles on the Listings V3 plugin.